BlinkyTape Orb
The code in this repository makes a BlinkyTape controller board act like an ambientdevices Ambient Orb and allows controlling it from Ruby over USB. Controlling the Orb from other languages should be simple—it only requires sending a few ASCII characters over the serial interface.
Ambient Orbs are great for displaying background information such as stocks,
the weather, or whether or not the master branch of your repository is
passing tests.
Custom Firmware for BlinkyTape controller board
A BlinkyTape has multiple individually-addressable LEDs connected to it. It can
recieve commands over the serial interface. The default firmware expects 3
bytes per pixel (values for red, green, and blue), followed by a 255 byte to
display everything. This protocol is required for compatibility with BlinkyTape
software such as PatternPaint.
On the other hand, the Ambient Orb accepts a color and animation, encoded as ASCII. After recieving a command, the Orb continues to animate (pulse) on its own. Like on the BlinkyTape, the button is used to cycle through several brightness levels.
The arduino directory in this repository contains custom firmware for the
BlinkyTape that makes it act more like an Ambient Orb. There are some
differences:
- Only 6 colors and 4 pulse speeds are accepted (vs. 37 and 10, respectively)
- As a result, the serial protocol is simplified to 1 ASCII character per command
- Brightness can be controlled via the serial protocol as well as via the hardware button (it's unclear if the Orb allowed this as well)
- Animations were recreated from memory without comparing them side by side with the Orb, so timing and transitions may vary.
See the Blinkinlabs arduino instructions for how to install the firmware. The firmware can be made to work on an Arduino Uno R3 with some modifications, mainly around the button handling.
Ruby Gem
The blinkytape-orb gem is a thin wrapper around the serial protocol
(described below). It also does automatic device detection if you only have one
Orb connected.
Here's how you might use it:
require 'blinkytape-orb'

# device is automatically detected on OS X
orb = BlinkyTapeOrb.new

# a device can be passed manually
#orb = BlinkyTapeOrb.new(:device => '/dev/ttyS0')

# a logger can also be passed
#orb = BlinkyTapeOrb.new(:logger => Logger.new(STDOUT))
#orb.logger.level = Logger::DEBUG

[
  BlinkyTapeOrb::BRIGHTNESS_MIN,
  BlinkyTapeOrb::BRIGHTNESS_MED,
  BlinkyTapeOrb::BRIGHTNESS_MAX,
].each do |brightness|
  orb.setBrightness(brightness)
  sleep(1)
end

sleep(3)

[
  [ BlinkyTapeOrb::COLOR_GREEN,  BlinkyTapeOrb::PULSE_NONE ],
  [ BlinkyTapeOrb::COLOR_BLUE,   BlinkyTapeOrb::PULSE_SLOW ],
  [ BlinkyTapeOrb::COLOR_PURPLE, BlinkyTapeOrb::PULSE_SLOW ],
  [ BlinkyTapeOrb::COLOR_YELLOW, BlinkyTapeOrb::PULSE_MED  ],
  [ BlinkyTapeOrb::COLOR_ORANGE, BlinkyTapeOrb::PULSE_MED  ],
  [ BlinkyTapeOrb::COLOR_RED,    BlinkyTapeOrb::PULSE_FAST ],
].each do |(color, pulse)|
  orb.setColorAndPulse(color, pulse)
  sleep(10)
end
Serial Protocol
The custom firmware accepts a single ASCII character per command. Color and pulse speed commands encode both attributes in a single character. In brightness commands, a single character corresponds to a single brightness.
Color and Pulse Speed
The two lowest bits encode the pulse speed:
-
00- No pulsing -
01- Slow pulsing -
10- Medium pulsing -
11- Fast pulsing
The next three bits encode the color:
-
000- Red -
001- Orange -
010- Yellow -
011- Green -
100- Blue -
101- Purple
To make the protocol easier to type by hand in a serial monitor, commands are
"shifted up" by 65 (ASCII "A"). For example, green and medium pulsing would be
encoded as 01110 (14), but this is sent as 79 (65+4), which is "O".
This encoding can be done easily in Ruby:
('A'.ord + (color * 4) + pulse).chrIn other words, "A" is red with no pulsing, followed by "B" for slow pulsing, "C" for medium pulsing, and "D" for fast pulsing. "E" is orange with no pulsing, "F" is orange with slow pulsing, etc.
Brightness
There are three settings encoded in two bits:
-
00- Dim -
01- Medium -
10- Bright
These are "shifted up" by 60 (ASCII "<"). So "<" is dim, "=" is medium, and ">" is bright. The Ruby one-liner for encoding is:
('<'.ord + brightness).chrHardware Setup
I stuck the BlinkyTape controller board on the plastic base of the Orb with a small styrofoam riser (poor man's 3D printer) and some double-sided tape. The adafruit NeoPixel 12-LED ring easily fits on the plastic base and in the hole in the bottom of the glass part of the orb. The ring rests on slightly higher styrofoam risers, above the controller board. I got the JST connector version of the controller board, snipped off the connector, and soldered the wires directly to the NeoPixel ring. The glass orb simply rests on the plastic base since there isn't anything for the base to screw into anymore. (The wires kind of help keep the base attached to the glass.) I considered getting a NeoPixel 7-LED jewel to sit in the center of the ring, but the 12 LEDs are plenty bright even in daylight.
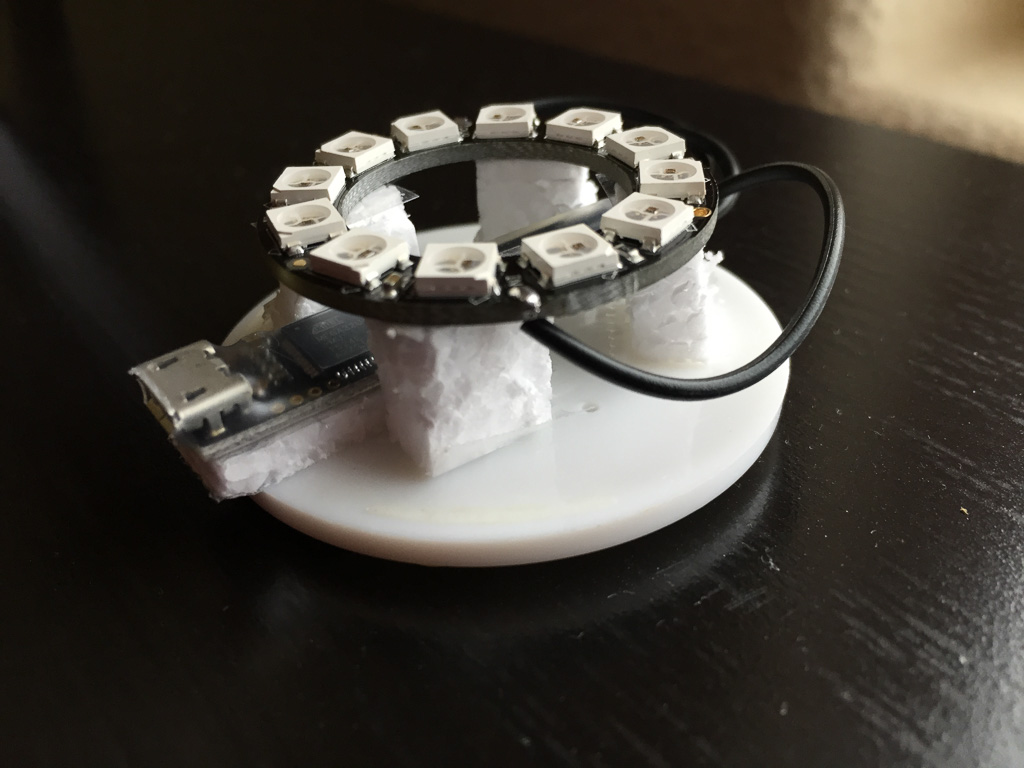
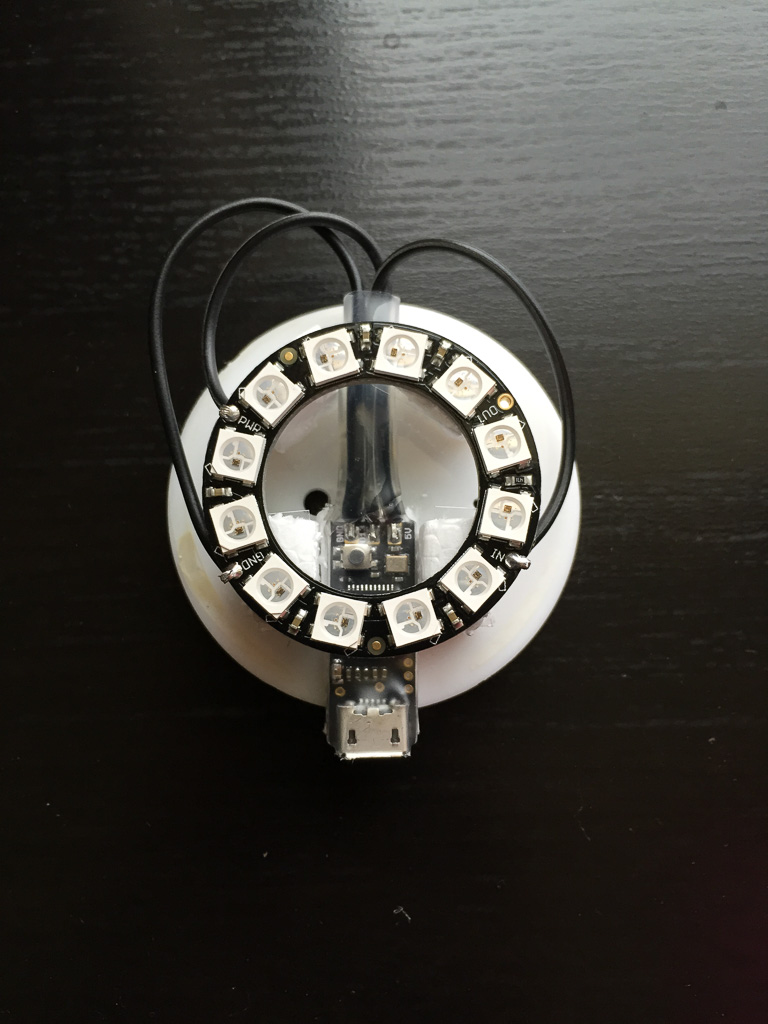
adafruit makes NeoPixel LEDs in a variety of form factors. I built another "Orb" using the 8-LED strip that has no enclosure—it is just attached to the underside of my monitor and lights up the monitor stand. The setup is relatively cheap, easy to assemble, and small enough to install just about anywhere.