Demo Mode
![]()
DemoMode is a drop-in "demo" interface for Rails apps, replacing your app's
sign-in form with a very customizable "persona" picker, with a list of
personas that can be defined in just a few lines of code. Each persona
represents a kind of user template, allowing you to generate fresh accounts
over and over.
This gem can be used to produce custom deployments of your app, and is ideal for enabling 💪 highly reliable and repeatable product demos 💪. It can also be used to produce sandbox deployments of your app/APIs, and since it also ships with a developer CLI, it is a super convenient tool for local development (as a replacement for pre-generated user seeds).
All icons, names, logos, and styles can be customized with your own branding, but if all you do is define a few personas, you'll get a fully-functioning interface out of the box (with your app's name in the upper left):
We recommend pairing this gem with
webvalve (to isolate your app from
any collaborating HTTP services) as well as a "factory" DSL like
factory_bot (for generating
accounts concisely). That said, you'll get the most mileage out of whatever
tools you already use in local development & testing, so if you already have
solutions for isolating your app and generating users, use those!
To learn more about how we use demo_mode at Betterment, check out ✨ "RAILS_ENV=demo" (RailsConf 2022) ✨:

Table of Contents
- Getting Started
- Installation
- App-Specific Setup
- Defining Personas
- Customizing the Design
- Optional Features
- The "Sign Up" Link
- The "Display Credentials" feature
- Developer CLI
- Callbacks
- Non-User Personas
- FactoryBot
sequenceextension - Database-backed sequences
- Persona Pooling
- Disabling Personas or Variants
- Deploying a demo environment to the cloud
- How to avoid breaking your new "demo" env
- How to Contribute
- Suggested Workflow
Getting Started
To get started, add the gem to your Gemfile and run bundle install:
gem 'demo_mode'Installation
Then, run the installer and the installed migrations:
bundle exec rails generate demo_mode:install
bundle exec rails db:migrate
The installer will create a config file (at config/initializers/demo_mode.rb)
and a sample persona (at config/personas/sample_persona.rb). You can ignore
the initializer file for now (it will be covered in the "Additional
Setup" section below).
You should, however, edit the sample persona and fill in the sign_in_as block
(don't worry about anything else—you can read "Defining
Personas" below once you're ready to add more personas):
sign_in_as do
  # Define your factory code here! For example:
  # FactoryBot.create(:user)
end
Next, "mount" the DemoMode engine at a route of your choice:
mount DemoMode::Engine => '/demo' # this will 404 unless Demo Mode is enabledFinally, launch the app in Demo Mode by setting DEMO_MODE=1 in your
environment:
DEMO_MODE=1 bundle exec rails s
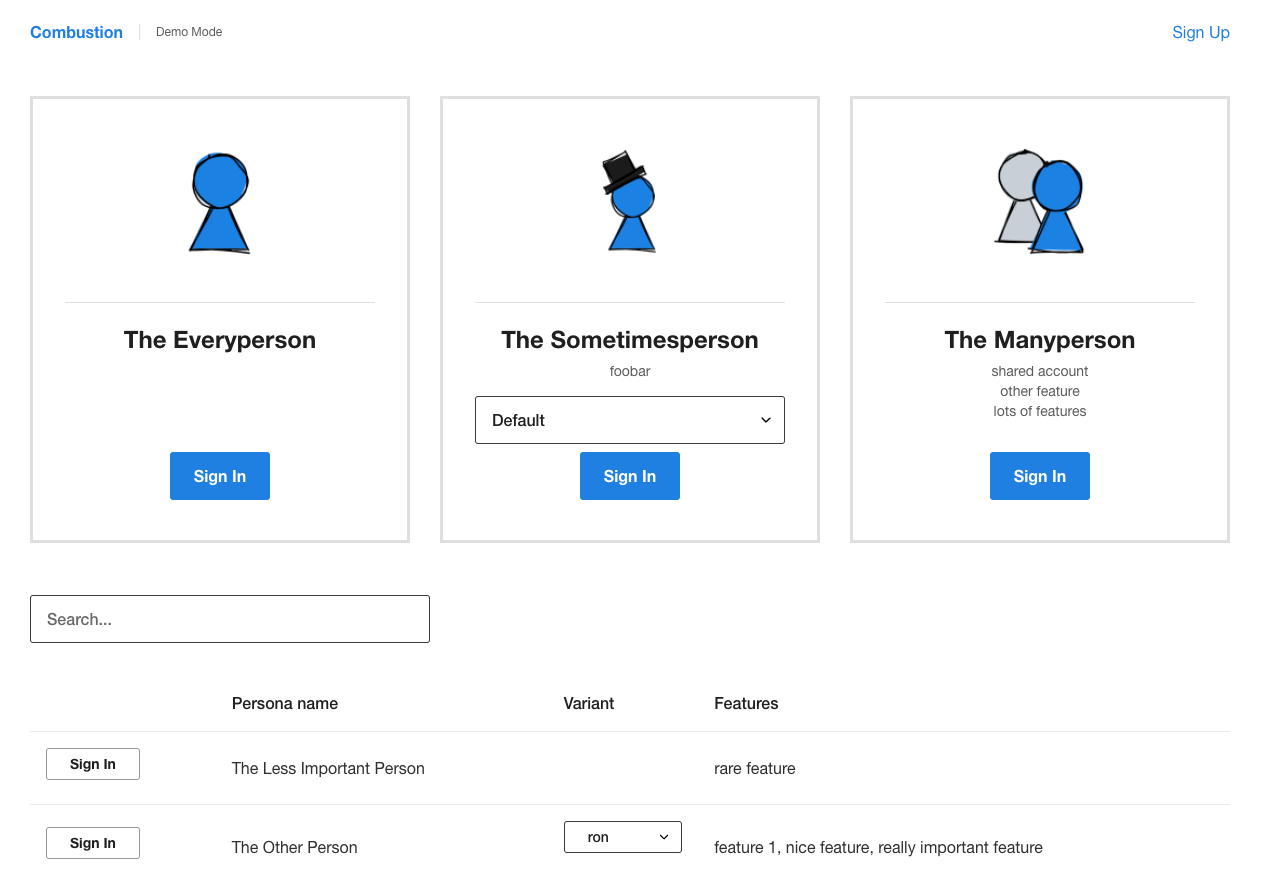
You should now see your requests rerouted to the following page:

If not, don't panic! Your app may need a bit of extra setup in order for the gem to work as expected, so continue on to the "App-Specific Setup" section.
Otherwise, if everything seems to be working, skip down to "Defining Personas" to add more personas, or "Customizing the Design" to add your own logo/colors/styles to the UI. There are also a few "Optional Features" to explore. And if you'd like to deploy a "demo" version of your app somewhere, check out "Deploying a demo environment to the cloud".
App-Specific Setup
Depending on the conventions of your application, you may need to set a few
extra values in your config/initializers/demo_mode.rb file.
1. Tell Demo Mode how to find your "current user"
Demo Mode assumes that your controllers define a conventional current_user
method. If your app uses something other than current_user, you may tell it
which method to call:
DemoMode.configure do
  current_user_method :current_human
end
2. Ensure that you have sign_in and sign_out methods
If your controllers do not already define sign_in and/or sign_out methods,
define these methods and point them to your true sign-in/sign-out behaviors:
# in your `app/controllers/application_controller.rb`:

def sign_in(signinable)
  # log_in!(user: signinable)
end

def sign_out
  # log_out!
end
3. Make sure ActiveJob is configured (and running)
In order to use the persona picker UI, your application must be capable of
running ActiveJob-based jobs. Read this
guide to get started
with ActiveJob.

If you're stuck on a loading spinner, you probably need to start a background
job worker, which will depend on your selected backend (e.g. rake jobs:work,
etc).
By default, Demo Mode will subclass its job off of ActiveJob::Base. If you
want to supply your own base job class, simply uncomment and update this config:
DemoMode.configure do
  base_job_name 'MyApplicationJob' # any ActiveJob-compliant class name
end
4. Tell Demo Mode which controllers to use
By default, Demo Mode will take over ApplicationController (and all of its
descendants), ensuring that any unauthenticated request is re-routed to the
persona picker. This may not be the preferred behavior (if, for example, all
you care about is rerouting the login page), so you can change this default:
DemoMode.configure do
  app_base_controller_name 'SignInsController' # or any controller of your choice
end
Alternatively, specific controllers can be excluded from this behavior by adding the following line at the top:
skip_before_action :demo_splash!, raise: falseFinally, when rendering the persona picker itself, Demo Mode will subclass itself
off of ActionController::Base. If you'd rather use/define your own base controller
for the demo splash page, you can supply its name:
DemoMode.configure do
  splash_base_controller_name 'MyDemoModeBaseController'
end
5. Accommodate uniqueness constraints & validations
When generating users on the fly, it is common to run into issues with UNIQUE
constraints. (e.g. If each user must have a unique email, your user-generation
code must account for this and generate a unique email each time.) If you are
using factory_bot, you will want
to enable our sequence patch, but be
mindful of the known issues.
Still stuck?
If none of the above gets your "persona picker" into a working state, feel free to add an issue with as many specifics and screenshots as you can provide.
Defining Personas
The demo_mode:install generator will install an empty persona at
config/personas/sample_persona.rb. By default, the file path will dictate the
name of the persona (via .titleize), and any persona files you create within
config/personas/ will automatically appear on the persona picker page (one
persona per file).
Of course, you can always override the name by passing it to the
generate_persona method:
DemoMode.generate_persona 'My Custom Name' do
  # ...
end
Within the generate_persona block, you will need to fill in
the sign_in_as block with your "factory" code of choice:
sign_in_as { FactoryBot.create(:user) }You should also specify a list of features to be displayed alongside the persona name:
features << '1 blog post'
features << '3 comments'
Personas up at the top (with user icons) are called "callout" personas and have
callout true declared:
callout truePersonas without callout true (or with callout false) will show up without
icons, and will appear instead in a searchable/filterable table, making it easy
to support a large number of personas. That said, if your list of personas is
getting too long, you can instead define multiple sign_in_as blocks as
"variants" of a single persona, which will give them a select dropdown in the
UI:
variant :pending_invite do
  sign_in_as { FactoryBot.create(:user, :pending_invite) }
end
If defined, the non-variant sign_in_as will show up as "default" in the
dropdown.
Customizing the Design
To supply your own branding, you can override the logo (in the upper left), the loading spinner (shown during persona generation), and the default persona icon:
DemoMode.configure do
  stylesheets.unshift 'first.css'
  stylesheets.push 'last.css'

  logo { image_tag('my-company-logo.svg') }
  loader { render partial: 'shared/loading_spinner' }

  # change the default persona icon to something else:
  icon 'path/to/icon.png'

  # `icon` may alternatively accept a block for arbitrary rendering:
  icon do
    # Any view helpers are available in this context.
    image_tag('images/dancing-penguin.gif')
  end

  # ...
end
Individual personas also support the icon option, and come with three built-in options:
DemoMode.add_persona do
  callout true # icons only apply to "callout" personas

  # Use a symbol for a built-in: `:user` (default), `:users`, and `:tophat`
  icon :tophat

  # Or, again, supply your own icon with a string or block:
  icon 'path/to/my/icon.png'
  icon { image_tag('images/dancing-penguin.gif') }

  # ...
end
The styles use these CSS variables, which you can override.
/* Use CSS variables to override the default font and colors: */
:root {
  --font-family: Papyrus, fantasy;
  --primary-color: red;
}
You can put anything you want in there! The persona picker UI is constructed largely with semantic markup and is intended to be easy to customize or style from scratch.
Optional Features
Your config/initializers/demo_mode.rb will be generated with many
commented-out lines. Here are a few optional features you might consider
un-commenting:
The "Sign Up" Link
To show a "sign up" link in the upper right of the splash page, provide your
sign_up_path like so:
DemoMode.configure do
  sign_up_path { new_account_path } # or any Rails route
end
You'll need to make sure that any sign-up-related controllers are excluded from
the splash page redirect, via a skip_before_action or by changing the
app_base_controller_name config. See the controller configuration
instructions above for
detailed instructions!
The "Display Credentials" feature
You may optionally display the account's credentials as an extra step, prior to signing in. This comes with the option to "sign in manually" (via your app's login form), and can be useful for stepping through login features like multi-factor authentication (which would otherwise be skipped by the persona picker):
DemoMode.configure do
  display_credentials
  sign_in_path { login_path } # tell Demo Mode where your login path is
end
You may also toggle this feature on or off on a per-persona basis:
DemoMode.add_persona do
  display_credentials false
end
By default, Demo Mode will generate a new password for you. Make sure that you
actually make use of DemoMode.current_password when constructing your user:
DemoMode.add_persona do
  sign_in_as do
    User.create(..., password: DemoMode.current_password)
  end
end
You may also define your own "password generator":
DemoMode.configure do
  # very random password:
  password { SecureRandom.uuid }

  # or always the same password:
  password { "RailsConf2022" }
end
Developer CLI
Demo Mode ships with a developer-friendly CLI! Simply run the following, and follow the interactive prompt to generate an account:
bundle exec rake persona:createThis will generate the account and output the sign-in credentials:
┏━━ ⭑ Basic User ⭑ ━━━━━━━━━━━━━━━━━━━━━━━━━━━━━━━━━━━━━━━━━━
┃ 👤 :: user-3@example.org
┃ 🔑 :: aReallyCoolPassword
┗━━━━━━━━━━━━━━━━━━━━━━━━━━━━━━━━━━━━━━━━━━━━━━━━━━━ (0.0s) ━
Much like the "Display Credentials" feature above,
you'll need to make use of DemoMode.current_password in your personas (and/or
customize the default password generator) in order for these credentials to be
valid!
You can customize the rake task's name within your app's Rakefile:
task create_user: 'persona:create'Callbacks
You may choose to wrap persona generation with some additional logic. Say, for example, you want to set some extra global state, or run some code that modifies every persona you generate:
DemoMode.configure do
  around_persona_generation do |generator, options|
    generator.call(options).tap do |account|
      account.update!(metadata: '123')
    end
  end
end
You must run generator.call and return the "signinable" object from
the callback block.
Non-User Personas
Sometimes the thing you want to demo isn't something a logged-in user would see, but also isn't something accessible to any visitor. For example, maybe your app supports private invite tokens, and you'd like to have a persona that generates a token and links to this exclusive "sign up" behavior.
To do this, you can define a persona that returns some other object in its
sign_in_as block. For example, let's return an invite token:
sign_in_as do
  FactoryBot.create(:invite_token)
end
Then, you can define a custom begin_demo behavior. This will replace the
usual sign_in(...) call with anything of your choice, and the model we
generated above is accessible as @session.signinable:
begin_demo do
  redirect_to sign_up_path(invite: @session.signinable.invite_token)
end
FactoryBot extensions
Factory bot ships two patches that may be manually loaded after loading FactoryBot:
require 'factory_bot'
require 'demo_mode/factory_bot_ext'
sequence
DemoMode comes with a patch designed to be a drop-in replacement for
factory_bot's sequence feature,
ensuring that sequences like this...
sequence(:column_name) { |i| "Something #{i}" }...will continue working across Ruby processes even after there are existing
records in the DB (rather than starting at "Something 1" each time). This
feature is necessary wherever you rely on UNIQUE constraints in the database,
or uniqueness validations on your models.
around_each hook
Use FactoryBot.around_each to wrap all factory execution, which can be used to
skip expensive callbacks/logging:
FactoryBot.around_each do |&blk|
  was_enabled = MyLogger.enabled?
  MyLogger.disable!
  blk.call
ensure
  MyLogger.enable! if was_enabled
end
Considerations
-
The sequences extension is not concurrency-safe, so if you run multiple server threads/processes, you will want to take out a mutex prior to generating each persona:
DemoMode.configure do
  # ...
  around_persona_generation do |generator|
    # Here we rely on https://github.com/ClosureTree/with_advisory_lock
    ActiveRecord::Base.with_advisory_lock('demo_mode') do
      generator.call
    end
  end
end
-
The sequences extension does not play well with deletions, since it may encounter these gaps and assume it has reached the next starting value. If your application must support deletions on models with sequences, the recommended workaround is to remove the impacted
UNIQUEconstraints (only in your deployed demo/sandbox instances, of course) and conditionally disable any uniqueness validations (e.g.validates ... unless DemoMode.enabled?).
Database-backed sequences
By default, CleverSequence (used by the FactoryBot sequence extension) uses an in-memory Ruby counter. For production demo environments running multiple processes or requiring persistence across restarts, you can enable PostgreSQL-backed sequences:
DemoMode.configure do
  CleverSequence.use_database_sequences = true
end
This feature flag controls whether CleverSequence uses PostgreSQL native sequences or the existing Ruby-based counter, allowing for gradual rollout and easy rollback. By default, use_database_sequences is false.
You can check the current setting with:
CleverSequence.use_database_sequences? # => false (default)You can also enforce that database sequences exist before they are used. When enabled, CleverSequence will raise an error if a sequence is requested but the corresponding PostgreSQL SEQUENCE does not exist yet (prompting the engineer to run a migration that creates the SEQUENCE). When disabled (the default), CleverSequence will fall back to calculating the next sequence value based on existing database data:
DemoMode.configure do
  CleverSequence.enforce_sequences_exist = true
end
You can check this setting with:
CleverSequence.enforce_sequences_exist? # => false (default)Persona Pooling
By default, Demo Mode generates persona accounts on-demand when a user clicks the persona picker. This means each click triggers a background job, and the user waits on a loading spinner. With persona pooling, accounts are pre-generated in the background so that sign-in is near-instant.
To enable pooling, schedule DemoMode::PoolHydrationJob to run periodically — every few minutes is a good starting point:
# Enqueue via your scheduler (e.g. Sidekiq-Cron, GoodJob, solid_queue, etc.)
DemoMode::PoolHydrationJob.perform_later
When called without arguments, the job runs in "orchestrator" mode: it checks the current pool depth for every persona+variant combination and enqueues individual hydration jobs for any that fall below the target size. Those leaf jobs each create one pre-generated session, then re-enqueue themselves until the target is reached.
DemoMode.configure do
  minimum_pool_size 10
end
When a user selects a persona, Demo Mode atomically claims a pre-generated session from the pool ("pool hit") or falls back to on-demand generation if the pool is empty.
Automatic invalidation: Pool sessions are tied to a checksum of the persona file. If you change a persona's definition, stale sessions are automatically skipped and fresh ones are generated on the next hydration run — no manual cleanup required.
Monitoring: Demo Mode emits ActiveSupport::Notifications events you can subscribe to:
| Event | Emitted when | Notable payload |
|---|---|---|
demo_mode.pool.depth |
Each orchestration run, per persona+variant |
persona_name, variant, value (sessions needed to reach target) |
demo_mode.session.claimed |
Each sign-in |
persona_name, variant, pool_hit: true/false
|
A pool_hit: false on demo_mode.session.claimed means the pool was empty at sign-in time and generation happened on-demand — a signal to increase minimum_pool_size or run hydration more frequently.
Disabling Personas or Variants
You can conditionally disable a persona or a variant by providing an enabled block. When the block returns false, the persona (or variant) is hidden from the picker UI, excluded from pool hydration, and treated as non-existent for session creation.
Persona-level:
DemoMode.add_persona 'Beta Feature' do
  enabled { FeatureFlags.beta_enabled? }
  features << 'Access to beta'
  sign_in_as { FactoryBot.create(:user, :beta) }
end
Variant-level:
DemoMode.add_persona 'Investor' do
  variant('default') { sign_in_as { FactoryBot.create(:investor) } }
  variant('accredited') do
    enabled { ENV['ACCREDITED_ENABLED'].present? }
    sign_in_as { FactoryBot.create(:investor, :accredited) }
  end
end
Common use cases include feature-flag-gated personas, environment-specific personas (e.g. only in staging), and temporarily hiding a persona without deleting its definition.
Deploying a demo environment to the cloud
This gem truly shines when used to deploy a "demo" version of your app to the cloud!
While the details of a custom environment deployment will vary
from app to app, you can get started by simply adding a
demo.rb file to your config/environments folder:
Rails.application.configure do
  ENV['DEMO_MODE'] = true

  # Recommended production-like behaviors:
  config.cache_classes = true
  config.eager_load = true
  config.consider_all_requests_local = false
  config.action_controller.perform_caching = true
  config.assets.compile = false
  config.assets.unknown_asset_fallback = false
  config.assets.digest = true
  config.force_ssl = true
  config.action_dispatch.show_exceptions = false

  # Recommended development/test-like behaviors:
  config.action_mailer.raise_delivery_errors = false
  config.action_mailer.perform_deliveries = false
end
We recommend using production-like caching/precompiling, but be
sure to use test/development-like configurations for emails and
any external HTTP requests / API connections! If you currently
have no way of stubbing out these behaviors, we strongly
encourage configuring your app to use
webvalve before
you attempt to set up a demo environment.
With the above environment configured, you can now launch your app in this mode:
RAILS_ENV=demo bundle exec rails s(Remember that you can always launch your app with DEMO_MODE=true, regardless
of the Rails environment, so don't worry about RAILS_ENV until it's time to
deploy something somewhere.)
How to avoid breaking your new "demo" env
Step 1: Tests!
It's strongly suggested that you build end-to-end integration/feature tests
into your application's test suite. You can toggle ENV['DEMO_MODE'] on and
off directly from within tests, or, if you use RSpec, you can enable Demo Mode
with the following before block:
before do
  allow(DemoMode).to receive(:enabled?).and_return(true)
end
Then, write a test that actually exercises the persona sign-in flow and steps through your app experience as that persona:
scenario 'an important product demo' do
  persona_picker.main_user.sign_in.click
  expect(demo_loading_page).to be_loaded
  work_off_jobs!

  expect(dashboard_page).to be_loaded
  expect(dashboard_page).to have_blog_posts(count: 1)
  # etc ...
end
This ensures that your demo personas are tested as part of your tests locally and in CI, and if your tests step carefully through the pages that are typically demoed, you can be more confident that changes to your app won't lead to surprise breakages in your demo-enabled environments.
You may also wish to add a "unit" tests to ensure that each persona can be generated on its own and doesn't rely on hardcoded values for uniqueness:
DemoMode.personas.each do |persona|
  persona.variants.keys.each do |variant|
    RSpec.describe("Persona: '#{persona.name}', '#{variant}'") do
      it 'can be generated twice in a row' do
        persona.generate!(variant: variant)
        persona.generate!(variant: variant)
      end
    end
  end
end
Step 2: Monitoring!
Finally, once you've deployed your demo environment, we encourage you to monitor it the same way you would your production instance. (This is especially important if you use this environment to deliver live product demos to other humans!)
Exceptions should be configured to go to your error tracker, alerts should still be wired up to ping your engineers, and if you operate an "on call" process, engineers should be made aware that this demo environment is a "production-like" environment and should expect "production-like" uptime guarantees.
We also emit an ActiveSupport::Notifications event
(demo_mode.persona_generated) every time a persona is generated, which can be
useful for tracking usage over time and alerting to any unexpected spikes,
drops in usage, and changes to performance. The custom event payload includes the
persona name and variant, in addition to standard attributes like execution
duration and exception details (if an error occurred during generation).
Again, to learn more about how we use and operate our "demo" environments at Betterment, check out our ✨ RailsConf 2022 talk entitled "RAILS_ENV=demo" ✨!
How to Contribute
We would love for you to contribute! Anything that benefits the majority
of demo_mode users—from a documentation fix to an entirely new
feature—is encouraged.
Before diving in, check our issue tracker and consider creating a new issue to get early feedback on your proposed change.
Suggested Workflow
- Fork the project and create a new branch for your contribution.
- Write your contribution (and any applicable test coverage).
- Make sure all tests pass (
bundle exec rake). - Submit a pull request.