 Glimmer DSL for WX
wxWidgets Ruby Desktop Development GUI Library
Glimmer DSL for WX is an MRI Ruby desktop development GUI (Graphical User Interface) library for the cross-platform native widget wxWidgets GUI toolkit. It provides a Glimmer GUI DSL on top of the wxruby3 binding.

Glimmer DSL for WX aims to provide a DSL similar to the Glimmer DSL for SWT to enable more productive desktop development in Ruby with:
- Declarative DSL syntax that visually maps to the GUI control hierarchy
- Convention over configuration via smart defaults and automation of low-level details
- Requiring the least amount of syntax possible to build GUI
- Custom Control support
- Bidirectional/Unidirectional Data-Binding to declaratively wire and automatically synchronize GUI Views with Models
- Scaffolding for new custom controls, apps, and gems
- Native-Executable packaging on Mac, Windows, and Linux.
This is a new Glimmer GUI library that is not fully developed yet. If you need a further developed GUI library, consider using Glimmer DSL for LibUI (Prerequisite-Free Ruby Desktop Development Cross-Platform Native GUI Library [Fukuoka Award Winning]) and Glimmer DSL for SWT (JRuby Desktop Development Cross-Platform Native GUI Framework).
Hello, World!
require 'glimmer-dsl-wx'

include Glimmer

frame(title: 'Hello, World!')
Hello Button!
require 'glimmer-dsl-wx'

include Glimmer

frame { |main_frame|
  title 'Hello, Button!'

  h_box_sizer {
    button {
      sizer_args 0, Wx::RIGHT, 10
      label 'Click To Find Who Built This!'

      on_button do
        about_box(
          name: main_frame.title,
          version: Wx::WXRUBY_VERSION,
          description: "This is the Hello, Button! sample",
          developers: ['The Glimmer DSL for WX Development Team']
        )
      end
    }
  }
}

Learn more about the differences between various Glimmer DSLs by looking at the Glimmer DSL Comparison Table.
Table of Contents
- Glimmer DSL for WX
- Setup
- Usage
- GIRB (Glimmer IRB)
- Smart Defaults and Conventions
- Samples
- Hello, World!
- Hello, Button!
- Hello, Sizer!
- Hello, Data-Binding!
- Coming From wxruby3
- Process
- Resources
- Help
- Issues
- Chat
- Planned Features and Feature Suggestions
- Change Log
- Contributing
- Contributors
- License
Setup
Follow instructions for installing wxruby3 on a supported platform (Linux or Windows): https://github.com/mcorino/wxRuby3/blob/master/INSTALL.md
Install glimmer-dsl-wx gem directly into a maintained Ruby version:
gem install glimmer-dsl-wx
Or install via Bundler Gemfile:
gem 'glimmer-dsl-wx', '~> 0.1.0'Test that installation worked by running a sample:
ruby -r glimmer-dsl-wx -e "require 'samples/hello/hello_world'"
If you cloned project, test by running a sample locally:
ruby -r ./lib/glimmer-dsl-wx.rb samples/hello/hello_world.rb
Usage
To use glimmer-dsl-wx:
- Add
require 'glimmer-dsl-wx'at the top of the Ruby file (this will automaticallyrequire 'wxruby3'too) - Add
include Glimmerinto the top-level main object for testing or into an actual class for serious application usage. - Write GUI DSL code beginning with
frameto build a window first and then nest other controls/sizers within it.
Example:
require 'glimmer-dsl-wx'

include Glimmer

frame { |main_frame|
  title 'Hello, Button!'

  h_box_sizer {
    button {
      sizer_args 0, Wx::RIGHT, 10
      label 'Click To Find Who Built This!'

      on_button do
        message_dialog(
          "The Glimmer DSL for WX Team",
          "Greeting",
          Wx::OK | Wx::ICON_INFORMATION
        ).show_modal
      end
    }
  }
}
Glimmer DSL for WX follows these simple concepts in mapping from wxruby3 syntax to Glimmer GUI DSL syntax:
Keyword(args): wxruby3 controls/sizers may be declared by lower-case underscored name. For example, Frame becomes frame. HBoxSizer becomes h_box_sizer. And, they receive the same arguments as the wxruby3 class constructor. For example, Frame.new(title: 'Hello') becomes frame(title: 'Hello').
Content Block (Properties/Listeners/Controls): Any keyword may be optionally followed by a declarative Ruby curly-brace multi-line content block containing properties (attributes), listeners, and/or nested controls/sizers.
Example:
frame(title: 'Hello, Button') {
  h_box_sizer {
    button(label: 'Click To Find Who Built This!')
  }
}
Content block optionally receives one arg representing the control or sizer it represents.
Example:
frame(title: 'Hello, Button!') { |main_frame|
  h_box_sizer {
    button {
      sizer_args 0, Wx::RIGHT, 10
      label 'Click To Find Who Built This!'

      on_button do
        about_box(
          name: main_frame.title,
          version: Wx::WXRUBY_VERSION,
          description: "This is the Hello, Button! sample",
          developers: ['The Glimmer DSL for WX Development Team']
        )
      end
    }
  }
}Property: Control properties may be declared inside keyword blocks with lower-case underscored name followed by property value args (e.g. title "Hello" inside frame). Behind the scenes, properties correspond to control.property= methods like frame.title=.
Controls and sizers (objects that organize controls within certain layouts) could accept a special sizer_args property, which takes the arguments normally passed to the sizer.add method. For example, sizer_args 0, Wx::RIGHT, 10 translates to sizer.add(control, 0, Wx::Right, 10) behind the scenes.
Listener: Control listeners may be declared inside keyword blocks with listener lower-case underscored name beginning with on_ followed by event name (translates to frame.evt_#{event_name} like frame.evt_button for the click of a button) and receiving required block handler (always followed by a do; end style block to signify imperative Model logic vs declarative View control/sizer nesting).
Example:
button('click') {
  on_clicked do
    puts 'clicked'
  end
}
Optionally, the listener block can receive an arg representing the control.
...
    button {
      sizer_args 0, Wx::RIGHT, 10
      label 'Click To Find Who Built This!'

      on_button do
        # Do work!
      end
    }
...
Behind the scenes, listeners correspond to frame.evt_#{event_name} methods. So, for on_button, the event name is button, and that translates to frame.evt_button(button, &listener) behind the scenes.
Operation: Controls have methods that invoke certain operations on them. For example, message_dialog has a #show_modal method that shows the message dialog GUI.
...
        message_dialog(
          "The Glimmer DSL for WX Team",
          "Greeting",
          Wx::OK | Wx::ICON_INFORMATION
        ).show_modal
...
GIRB (Glimmer IRB)
You can run the girb command (bin/girb if you cloned the project locally) to do some quick and dirty experimentation and learning:
girb
This gives you irb with the glimmer-dsl-wx gem loaded and the Glimmer module mixed into the main object for easy experimentation with GUI.
Smart Defaults and Conventions
- Instantiate any wxWidgets control or sizer by using its underscored name (e.g.
Buttonbecomesbutton) -
framewill automatically execute within aWx::App.runblock andshowthe Frame
Samples
Hello, World!
require 'glimmer-dsl-wx'

include Glimmer

frame(title: 'Hello, World!')
Alternate Syntax:
require 'glimmer-dsl-wx'

include Glimmer

frame {
  title 'Hello, World!'
}
Hello Button!
require 'glimmer-dsl-wx'

include Glimmer

frame(title: 'Hello, Button!') { |main_frame|
  h_box_sizer {
    button(label: 'Click To Find Who Built This!') {
      sizer_args 0, Wx::RIGHT, 10

      on_button do
        about_box(
          name: main_frame.title,
          version: Wx::WXRUBY_VERSION,
          description: "This is the Hello, Button! sample",
          developers: ['The Glimmer DSL for WX Development Team']
        )
      end
    }
  }
}
Alternate Syntax:
require 'glimmer-dsl-wx'

include Glimmer

frame { |main_frame|
  title 'Hello, Button!'

  h_box_sizer {
    button {
      sizer_args 0, Wx::RIGHT, 10
      label 'Click To Find Who Built This!'

      on_button do
        about_box(
          name: main_frame.title,
          version: Wx::WXRUBY_VERSION,
          description: "This is the Hello, Button! sample",
          developers: ['The Glimmer DSL for WX Development Team']
        )
      end
    }
  }
}
Hello Sizer!


require 'glimmer-dsl-wx'

include Glimmer

frame { |main_frame|
  title 'Hello, Sizer!'

  h_box_sizer {
    v_box_sizer {
      sizer_args 0, Wx::RIGHT, 10

      button {
        sizer_args 0, Wx::DOWN, 10
        label 'Greeting 1'

        on_button do
          message_dialog(
            "Hello",
            "Greeting 1",
            Wx::OK | Wx::ICON_INFORMATION
          ).show_modal
        end
      }

      spacer(10)

      button {
        sizer_args 0, Wx::DOWN, 10
        label 'Greeting 2'

        on_button do
          message_dialog(
            "Howdy",
            "Greeting 2",
            Wx::OK | Wx::ICON_INFORMATION
          ).show_modal
        end
      }

      spacer(10)

      button {
        sizer_args 0, Wx::DOWN, 10
        label 'Greeting 3'

        on_button do
          message_dialog(
            "Hi",
            "Greeting 3",
            Wx::OK | Wx::ICON_INFORMATION
          ).show_modal
        end
      }
    }

    v_box_sizer {
      sizer_args 0, Wx::RIGHT, 10

      button {
        sizer_args 0, Wx::DOWN, 10
        label 'Greeting 4'

        on_button do
          message_dialog(
            "Ciao",
            "Greeting 4",
            Wx::OK | Wx::ICON_INFORMATION
          ).show_modal
        end
      }

      spacer(10)

      button {
        sizer_args 0, Wx::DOWN, 10
        label 'Greeting 5'

        on_button do
          message_dialog(
            "Aloha",
            "Greeting 5",
            Wx::OK | Wx::ICON_INFORMATION
          ).show_modal
        end
      }

      spacer(10)

      button {
        sizer_args 0, Wx::DOWN, 10
        label 'Greeting 6'

        on_button do
          message_dialog(
            "Salut",
            "Greeting 6",
            Wx::OK | Wx::ICON_INFORMATION
          ).show_modal
        end
      }
    }
  }
}
Hello Data-Binding!
Glimmer DSL for WX supports data-binding via <= for unidirectional data-binding and <=> for bidirectional data-binding.

require 'glimmer-dsl-wx'

class Donor
  DONATION_AMOUNT_MIN = 0
  DONATION_AMOUNT_MAX = 100
  DONATION_AMOUNT_DEFAULT = 50

  attr_accessor :first_name, :last_name, :donation_amount

  def initialize
    @last_name = @first_name = ''
    @donation_amount = DONATION_AMOUNT_DEFAULT
  end

  def full_name
    full_name_parts = [first_name, last_name]
    full_name_string = full_name_parts.join(' ').strip
    if full_name_string.empty?
      'Anonymous'
    else
      full_name_string
    end
  end

  def summary
    "#{full_name} donated $#{donation_amount}"
  end
end

donor = Donor.new

include Glimmer

frame(title: 'Hello, Data-Binding!') { |window|
  panel {
    v_box_sizer {
      h_box_sizer {
        sizer_args 0, Wx::DOWN, 10

        static_text(label: 'First Name:') {
          sizer_args 0, Wx::RIGHT, 10
        }
        text_ctrl {
          sizer_args 0, Wx::RIGHT, 10
          # data-bind donor.first_name to text_ctrl.value bidirectionally,
          # ensuring changes to either attribute update the other attribute
          value <=> [donor, :first_name]
        }
      }

      h_box_sizer {
        sizer_args 0, Wx::DOWN, 10

        static_text(label: 'Last Name:') {
          sizer_args 0, Wx::RIGHT, 10
        }
        text_ctrl {
          sizer_args 0, Wx::RIGHT, 10
          # data-bind donor.last_name to text_ctrl.value bidirectionally,
          # ensuring changes to either attribute update the other attribute
          value <=> [donor, :last_name]
        }
      }

      h_box_sizer {
        sizer_args 0, Wx::DOWN, 10

        static_text(label: 'Donation Amount: $') {
          sizer_args 0, Wx::RIGHT, 1
        }
        spin_ctrl {
          sizer_args 0, Wx::RIGHT, 10
          range Donor::DONATION_AMOUNT_MIN, Donor::DONATION_AMOUNT_MAX
          # data-bind donor.donation_amount to spin_ctrl.value bidirectionally,
          # ensuring changes to either attribute update the other attribute
          value <=> [donor, :donation_amount]
        }
      }

      h_box_sizer {
        sizer_args 0, Wx::DOWN, 10

        slider {
          sizer_args 0, Wx::RIGHT, 10
          range Donor::DONATION_AMOUNT_MIN, Donor::DONATION_AMOUNT_MAX
          # data-bind donor.first_name to spinner.value bidirectionally,
          # ensuring changes to either attribute update the other attribute
          value <=> [donor, :donation_amount]
        }
      }

      h_box_sizer {
        sizer_args 0, Wx::DOWN, 10

        static_text(label: '') {
          sizer_args 0, Wx::RIGHT, 10
          # data-bind donor.summary to static_text.label unidirectionally,
          # with computed data-binding from donor summary dependencies: first_name, last_name, and donation_amount
          # ensuring changes to donor.summary or any of its dependencies update static_text.label
          label <= [donor, :summary, computed_by: [:first_name, :last_name, :donation_amount]]
        }
      }
    }
  }
}
Coming From wxruby3
If you would like to translate wxruby3 code into Glimmer DSL for WX code, read the Usage section to understand how Glimmer GUI DSL syntax works, and then check out the example below, which is written in both wxruby3 and Glimmer DSL for WX.
Example written in wxruby3:
require 'wx'

class TheFrame < Wx::Frame
  def initialize(title)
    super(nil, title: title)
    panel = Wx::Panel.new(self)
    button = Wx::Button.new(panel, label: 'Click me')
    button.evt_button(Wx::ID_ANY) { Wx.message_box('Hello. Thanks for clicking me!', 'Hello Button sample') }
  end
end

Wx::App.run { TheFrame.new('Hello world!').show }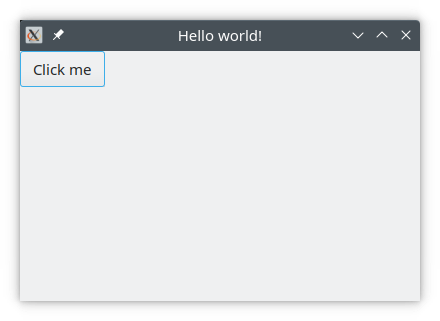
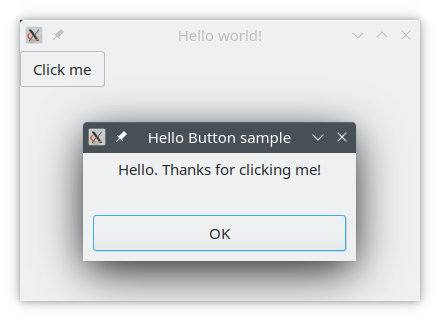
Example re-written in Glimmer DSL for WX:
require 'glimmer-dsl-wx'

include Glimmer

frame(title: 'Hello world!') {
  panel {
    button(label: 'Click me') {
      on_button do
        Wx.message_box('Hello. Thanks for clicking me!', 'Hello Button sample')
      end
    }
  }
}
Process
Resources
- Code Master Blog
- wxruby3 Bindings (used by Glimmer DSL for WX)
- wxWidgets GUI Toolkit (used by Glimmer DSL for WX)
- wxWidgets Controls
- wxWidgets Sizers
Help
Issues
If you encounter issues that are not reported, discover missing features that are not mentioned in TODO.md, or think up better ways to use wxWidgets than what is possible with Glimmer DSL for WX, you may submit an issue or pull request on GitHub. In the meantime, you may try older gem versions of Glimmer DSL for WX till you find one that works.
Chat
If you need live help, try to
Planned Features and Feature Suggestions
These features have been planned or suggested. You might see them in a future version of Glimmer DSL for WX. You are welcome to contribute more feature suggestions.
Change Log
Contributing
If you would like to contribute to the project, please adhere to the Open-Source Etiquette to ensure the best results.
- Check out the latest master to make sure the feature hasn't been implemented or the bug hasn't been fixed yet.
- Check out the issue tracker to make sure someone already hasn't requested it and/or contributed it.
- Fork the project.
- Start a feature/bugfix branch.
- Commit and push until you are happy with your contribution.
- Make sure to add tests for it. This is important so I don't break it in a future version unintentionally.
- Please try not to mess with the Rakefile, version, or history. If you want to have your own version, or is otherwise necessary, that is fine, but please isolate to its own commit so I can cherry-pick around it.
Note that the latest development sometimes takes place in the development branch (usually deleted once merged back to master).
Contributors
- Andy Maleh (Founder)
Click here to view contributor commits.
License
Copyright (c) 2023-2026 Andy Maleh
--
![]() Built for Glimmer (DSL Framework).
Built for Glimmer (DSL Framework).