Skippy
![]()
Skippy is a Command Line Interface which aims to automate common developer tasks for SketchUp Ruby extension development.
It is currently in very early stage of development so many things are incomplete. Feedback and contributions are welcome.
Some of the main goals are:
- Quick initialization of new project with templates
- Add/Remove/Update user templates
- Automate common tasks
- Packaging the extension
- Launch SketchUp
- Launch SketchUp in debug mode
- Easy interface to add per-project custom commands/tasks
- Library dependency management
- Pull in third-party modules into extension namespace
- Add/Remove/Update dependencies
Requirements
Your system will need a version of Ruby 2.0 or newer installed.
macOS have a system version of Ruby already installed. If you need/want a different version you can for instance use RVM.
For Windows the easiest way to get Ruby running is using the Ruby Installer for Windows.
Installation
gem install skippy --preUsage
After installing the gem on your system, the skippy command should become available.
Quick-Reference
Type skippy to list available commands.
Type skippy help [COMMAND] for more information on how to use each command.
Use skippy new NAMESPACE to create a new project in the current folder.
You can add custom per-project commands to a skippy folder in your project. Look at skippy/example.rb for an example of a simple custom command.
Project Setup
Create a new Skippy powered project by using the skippy new command in the project's root directory. Provide Skippy with the extension namespace:
skippy new Example::HelloWorldSkippy will then scaffold the bare minimum for a SketchUp extension.
Currently Skippy assumes that the source for the extension is located under a directory named src.
Project Templates
TODO: ...
Custom Project Commands
In addition to scaffold the extension source code Skippy also creates a directory named skippy in the project root. Here it is possible to add custom Skippy commands to aid your project development. For instance running build scripts and other task automations.
Look at the default skippy/example.rb.
Power of Thor
Skippy is built on Thor. Refer to Thor's Website and documentation for details on creating commands.
When creating Skippy command use the following replacements:
- Instead of class
Thor, useSkippy::Command - Instead of class
Thor::Group, useSkippy::Command::Group
Installing Libraries
Skippy offer a simple library dependency system. It can install a third party library into project workspace where by its various modules can be integrated into your extension project.
The installed library is cached into .skippy directory. Don't check this into version control.
When you check out an existing Skippy Project from source control use skippy install to install the required dependencies.
Installing from Git Repositories
skippy lib:install https://github.com/thomthom/tt-lib.gitInstalling from Git shorthand.
skippy lib:install thomthom/tt-libIn the above example Skippy will look for the library tt-lib under the username thomthom from either bitbucket.org or github.com
The sources can be altered per project by modifying sources in skippy.json:
  "sources": [
    "github.com",
    "bitbucket.org"
  ],
Note that currently all source will be prefixed https:// and post-fixed with the provided short-name. E.g., thomthom/tt-lib will resolve to http://github.com/thomthom/tt-lib.git and http://bitbucket.org/thomthom/tt-lib.git as skippy searches for matching sources.
Installing from Local Directory
skippy lib:install ~/source/my-libIt is also possible to install from a local directory. Pass in the path to the directory that contains the skippy.json of the library.

Using Modules
Once a library is installed its modules can be used within the extension project. List the names of the available modules using skippy lib:list.
Once you know the name you can instruct Skippy to use it:
skippy lib:use tt-lib/glThis will copy the module from the .skippy directory and into src/<ExtensionName>/vendor/<LibraryName>. At the same time the outer namespace in the source code is changed to match your project's namespace.
Removing Modules
A library module can be removed by using skippy lib:remove:
skippy lib:remove tt-lib/glThis removes the files for that module from the vendor directory.

Uninstalling Libraries
Libraries can be completely removed from a project using skippy lib::uninstall:
skippy lib:uninstall tt-libThis will remove all the library's modules in the vendor directory as well as removing the cached library in .skippy.

Anatomy of a Skippy Library
Below is an example of a simple Skippy Library:
example-library/
├── modules/
│   ├── hello/
│   │   ├── extra.html
│   │   └── extra.rb
│   ├── hello.rb
│   └── world.rb
└── skippy.json
Each .rb under the modules directory is a Skippy Module. In this example the library contains the modules hello and world.
Each Skippy Module can have a support directories where additional source code or assets can be organized. This support directory must match the filename of the module. In the example above this is illustrated by the Ruby file modules/hello.rb along with directory modules/hello.
skippy.json contains meta data which is required to identify the library:
{
  "library": true,
  "name": "my-lib",
  "version": "1.0.0"
}
The name value from skippy.json is the name that the users will use to refer to the library via skippy.
If distributing the library via Git, the version value should match the tag from source control.
A library can contain additional files or directories, for instance tests. They will simply be ignored by skippy.
For more examples, refer to:
Launching SketchUp
Skippy will attempt to locate your SketchUp installations and offer commands to launch them.
These commands provides a cross platform way of launching SketchUp which can be useful in build scripts or IDE automation tasks.
(Note: Currently Skippy assumes that SketchUp is installed to its default installation directory.)
skippy sketchup:list will display a list of all known SketchUp versions on the system.
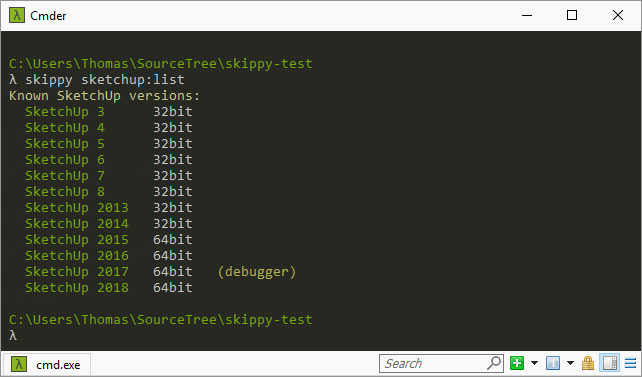
To launch one, use skippy sketchup:launch VERSION, for instance:
skippy sketchup:launch 2018
You can also launch SketchUp in debug mode if the SketchUp Ruby Debugger library is installed.
skippy sketchup:debug 2018
Development
After checking out the repository, run bin/setup to install dependencies. Then, run rake test to run the tests. You can also run bin/console for an interactive prompt that will allow you to experiment.
If there are problems installing dependencies try installing them locally and see if that works: bundle install --path vendor/bundle
To install this gem onto your local machine, run bundle exec rake install. To release a new version, update the version number in version.rb, and then run bundle exec rake release, which will create a git tag for the version, push git commits and tags, and push the .gem file to rubygems.org.
Reminders
Run individual tests: bundle exec rake test TEST=test/library_source.rb
Run individual cucumber features: bundle exec cucumber features/library.feature
FAQ
SSL Errors?
oneclick/rubyinstaller#324 (comment)
Download newest certs (cacert.pem) from here
https://curl.haxx.se/docs/caextract.html
Set environment variable to the full path location of the downloaded file. Eg:
set SSL_CERT_FILE=C:\somewhere\cacert.pemTo make it permanent, set
SSL_CERT_FILEin "Advanced System Settings"
Contributing
Bug reports and pull requests are welcome on GitHub at https://github.com/thomthom/skippy.
License
The gem is available as open source under the terms of the MIT License.